4
$\begingroup$

I have been working on how the GPU does parellel processing, and branching. However I am not yet to the point where I know how to make this shader more efficent. Essentially I dont know enough about how it works.

Anyway I have the following shader:

precision highp float;

varying vec3 o_color; //Color it should be
varying vec2 texture_coord; //Interpolated value 0-1
varying float ratio_out; //This is the height / width of the capsule on screen
varying float rdistOut; //This number is used to fill in all pixels when particle is slow enough for the geometry to be a square but still has some distance from last position.

void main()
{


    vec2 yCoord = vec2(0.5);
    float yScale = ratio_out;

    vec2 my = texture_coord * vec2(1.0, yScale);

    vec2 del = yCoord - my;

    float len = del.x * del.x + del.y * del.y;
    if ((!(my.y > 1.0) && (len < 0.25)) || (my.y > yCoord.y && my.y < rdistOut))
    {
        gl_FragColor = vec4(o_color, 1.0);
    }
    else
    {
        gl_FragColor.a = 0.0;
    }
}

What it does is draw capsules on the screen. Basically these capsules connect where the particle was to where it is.

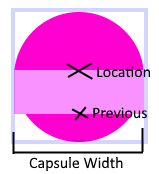
On the cpu I compute the vertices of this with some linear algebra, but in screen space terms the rectangle we will be shading has a maximum width of W and a minimum height of W. If the capsule is moving faster then W/2 then the capsules geometry will start to get longer to accommodate.

Here are some diagrams of what is going on:

This is an image of a single capsule. Because the distance between the current and last position is not large enough so the screen-space geometry is a square. You can see that to compensate that lighter area is shaded in as well to connect the two points.

enter image description here

Here are some more examples of what could happen enter image description here
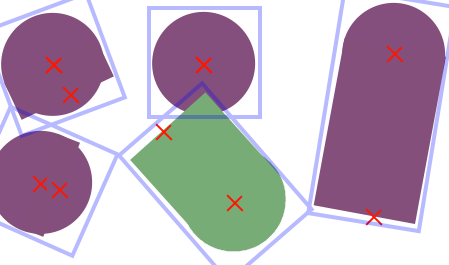
The thing is these capsules are all individual, sometimes every capsule will be elongated, sometimes it will only be a small percent. This shader needs to be as steady fps as possible.

Now here are some tips that are useful and might help make things more efficent:

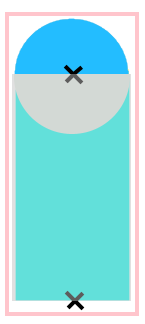
  1. The dot product is NEVER needed past the point where the circle part is done.
  2. If the scaleFactor is greater then 1 then the dot product is never needed past the center of the circle.

This is shown in this diagram. In this case none of the grey area needs to preform the dot product. enter image description here
Explanation of variables:

o_color: is the color that that particle is

texture_coord: these are the exact same as if you were going to texture this, they go from 0-1

ratio_out: height / width. Will never be less then 1

Inside the main function to get the coordinates in screen scale we simply multiply the y texture coordinate by the scale factor. That makes the center of the circle part a 0.5, 0.5.

rdistOut is the tiny area that the particle sometimes has when it is a square but still moving. Things should be shaded from 0.5-rdistOut.

Could you please help me remove un-needed dot product computations and comparisons as well as get rid of branching?

Please include an explanation of how you got the GPU to skip dot product calculations or why you did what you did. Next time I hope to be able to do this myself.
$\endgroup$
6
  • $\begingroup$ To clarify, is the dot product you are referring to "len"? $\endgroup$
    – aces
    Commented Sep 3, 2016 at 3:41
  • $\begingroup$ Yes, I have used dot(delta, delta) before in place of dist * dist. I just did the dot product that way to simplify things. $\endgroup$
    – J.Doe
    Commented Sep 3, 2016 at 3:43
  • $\begingroup$ What is the average speed of the particle? Is it normal to be the same size as that blue diagram at the bottom? I'm just trying to get a good idea of the use cases. $\endgroup$
    – aces
    Commented Sep 3, 2016 at 4:02
  • 1
    $\begingroup$ @J.Doe: The only way you could avoid the dot product would be... by using a conditional branch around it. Which could wind up being slower than just doing the dot product. And let's face facts: a 2D vector dot-product is trivially fast on GPUs these days. $\endgroup$ Commented Sep 4, 2016 at 3:49
  • 1
    $\begingroup$ This shader looks like it should be super fast already, can't think of any further optimizations really. If / else branches will only really hurt you in a shader if you have a fair bit of code in each branch, here you're not even doing any arithmetic in the branches, just returning values, so the performance hit should be negligible. You could always replace it with a ternary operator, as in gl_FragColor = (condition) ? true_value : false_value. This compiles to a conditional move rather than a branch, so might get you a small speed boost. $\endgroup$
    – russ
    Commented Sep 5, 2016 at 3:14

1 Answer 1

6
$\begingroup$

Rather than trying to speed up your shader by fiddling with the code, can I suggest you make use of the GPU's inherent ability to rapidly fill polygons? This will allow it to eliminate the vast bulk of the cases where there is no need to even make a decision.

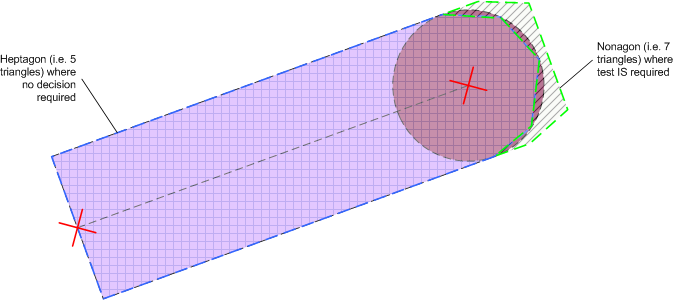
What I suggest you try is something like the following: Create, say, a heptagon (i.e. the blue dashed outline (note: it shares some of the boundary with the green but I just noticed this is not particularly obvious in the diagram)) that starts from the original location and extends to the new position but lies inside the extremes of the new location's circle. The shader for this is then utterly trivial.

enter image description here

Then there can be one or two cases depending on how much you want to optimise. If the tail extends outside of the end position circle, you draw the green-dashed nonagon with your decision-based shader. This contains vastly fewer pixels. If the tail doesn't extend outside, then you'll need to mirror this polygon to get the other side of the circle. Alternatively, rather than make the decision, you could always mirror it and let the Z-test eliminate unneeded fills.

Your examples also have the have the capsules shown as opaque. If this is the case, you can also make gains with, say, TBDR-systems (a blatant PowerVR plug :-) ) or those with early-Z, provided you supply all your opaque "tail" portions first and then follow with all parts requiring decisions.

The shapes of course were just examples. You may find it's better to use more segments in your outlines in order to reduce the regions requiring the complex shader.

$\endgroup$

Your Answer

By clicking “Post Your Answer”, you agree to our terms of service and acknowledge you have read our privacy policy.

Not the answer you're looking for? Browse other questions tagged or ask your own question.